Categories: Electrician at home, Sockets and switches, Electric installation work
Number of views: 84676
Comments on the article: 9
How to properly transfer the socket and switch
 The need to transfer sockets and switches, as a rule, arises after moving furniture in the apartment, or when wiring is brought to the so-called European standard, according to which sockets are installed at a height of 20 - 30 centimeters, and switches at a height of 90 - 120 centimeters from the floor.
If need to lower the outlet, and the wiring is made in a coupler, it is enough to install a new installation box in the required place and shorten the cable to the desired length. The situation is more complicated when required build up cable. Two tasks immediately arise here. How to connect cable cores so that the connection is high-quality and durable, and what to do with the old installation box.
The worst solution to this issue is to connect the cable, for example, twisting the wires, insulate twisting, cover up the wires with alabaster in the old installation box and forget where this time bomb is located.
According to existing rules, all cable conductor connections must be accessible for inspection. But this rule is far from always fulfilled, and finding terminal boxes is often a daunting task. When upgrading the electrical network, it is always advisable to plot the cable paths and the exact bindings of the terminal boxes.
The wiring should last at least 20 years. And where is the guarantee that done wire connection will last all these years.
The most reliable connection of copper conductors is welding and crimping. These methods require special tools and skills, but may well be replaced by simpler solutions.
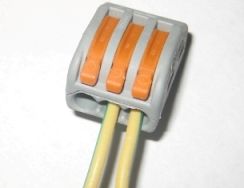
For connecting the cores of the cables of the lighting network, the current in which rarely exceeds 2 - 3 Amperes, it is quite suitable Wago Flat Spring Terminal Blocks. Shown in fig. 1 222 series terminal blocks allow you to quickly connect and disconnect wires. In my personal experience, over two years of operation of the terminal blocks of this series at currents of 4 - 5 Amps of two thousand terminal blocks burned out only one.

Fig. 1. Terminal block Wago (type 222)
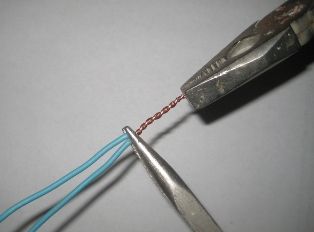
For an outlet network, it is preferable to use time-tested types of wire connections. In fig. 2 shown twisting two wires. For its implementation on both wires, insulation is removed on a plot of about 25 - 30 millimeters. The cores must be stripped with a fine emery cloth. It is very important not to pull the twist so that the conductors do not break.
Fig. 2. Twisting of cable veins
In fig. Figure 3 shows a close-up. After twisting the wires, the twist is soldered with lead - tin solder. For soldering, it is advisable to use rosin. Acid fluxes should not be used. It remains to carefully insulate the joints and lay the wires in the box.

Fig. 3. Close-up twisting
A well-made twist can last several decades without any soldering. In it, the cores are crushed into each other, forming a very reliable contact with a large area of contact. But, the quality of the twist to a large extent depends on the qualifications of an electrician. Therefore, at present, the connection of wires by the method of twisting by the inspectors of the Energy Supervision is not welcome.
The situation is more complicated when it is necessary to connect a copper wire with aluminum. They should never be twisted together. The most affordable at home connection of a copper wire with aluminum is to bend both conductors with a ring and tighten with a bolt connection through a steel galvanized washer.
In a bolted connection, you must use a good engraving washer and lock the connection with a second nut.The second nut will prevent self-unwinding of the connection, the engraver compensates for the shrinkage of the aluminum wire. The fact is that aluminum in the “compressed” state has the property to shrink, as a result of which the contact transition resistance increases.
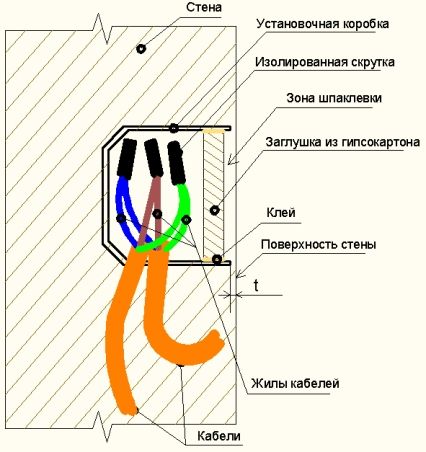
Now consider the second part of the problem - what to do with the old installation box. If the former place of the outlet is covered with furniture, then the installation box can simply be closed with a lid, laying the connected insulated wires in it. If this place is in sight, then the old installation box will have to be closed and this place puttied. In fig. Figure 4 shows a section of a wall with a mounting box for a socket, which will now act as a terminal box.
Fig. 4. Section of the wall with the installation box
It is highly undesirable that the junction of the cable cores come into contact with cement mortars and various putties. To allow this, fairly sophisticated isolation methods must be used. with heat shrink tubing. Easier to cut, as shown in fig. 4 circle of drywall and paste it into the box. Liquid nails are suitable for gluing. After the glue dries, the box is puttied.
It is very important to pay attention to the distance from the end of the box to the surface of the wall. In fig. 4, this distance is designated as “t”. If the installation box is steel, and the distance from its end to the wall surface is less than a millimeter, then a circle is guaranteed to appear on the wallpaper glued in this place - rust will come to the surface.
Old metal boxes, which are still common in our homes, rust quite strongly - after all, when gluing wallpaper, the glue can dry out for a day. And all this time the box will be subject to moisture. In the case of painting the wall, rust will also not take long. Therefore, a metal box, if it is very close to the wall surface, should either be carefully bent inward or replaced with a plastic one.
See also:How to install a block of electrical switches with a socket
See also at e.imadeself.com
:


