Categories: Featured Articles » Electrician at home
Number of views: 238,573
Comments on the article: 14
Wiring methods: from twists to soldering
 The article describes the various methods of connecting wires when wiring.
The wiring device requires a reliable connection of wires. In the sixties and seventies of the twentieth century, during the construction of the "Khrushchev" houses, wiring, purely for economic reasons, was carried out by an aluminum wire.
All connections in this wiring were made by the method of twisting, which were isolated with black cloth tape, and could last ten or more years without requiring any maintenance or prevention. Of course, if the twisting was performed according to all the rules. Therefore, old electricians argue that there is simply no more reliable twist, no connection.
Partly they are right. In those days, there was no other way, and it was not required, because the apartments did not yet have such an abundance of electrical and electronic equipment as now. The power of the then refrigerators, washing machines, irons and electric kettles was much lower than modern ones. And not all of them had refrigerators, televisions and washing machines.
And electricity consumers like air conditioners, computers, home theaters in apartments were not used at all. Then they just have not yet been invented. Therefore, it was possible to perform wiring with aluminum wires, and wire connection using twists.
Modern Wiring Requirements
In modern conditions, wiring is most often performed by copper wires, which allows you to connect the load of almost any power. Various methods are now used to connect the wires. This is stipulated in the rules of electrical installations (PUE). Literally they say: quote.
PUE: p2.1.21. Connection, branching and termination of conductors of wires and cables should be carried out by crimping, welding, soldering or clamping (screw, bolt, etc.) in accordance with applicable instructions.
From this paragraph of the rules it follows that it is impossible to connect wires with twist, it simply does not exist in the indicated paragraph. If the fire inspector will accept the wiring, then he simply will not accept the wiring made by the twist method, and it will have to be redone. Twisting is permissible only as a temporary joint before welding, which will be discussed in the next article.
Connection of wires with clamps
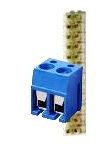
According to the specified item of the PUE, for connecting wires currently exist terminal blockswhich should be used. The most common are three types of terminal blocks. These are self-locking, screw and connecting insulating clamps. Figure 1 shows a self-clamping terminal block.

Figure 1. Self-locking terminal block
Self-locking terminal blocks designed to connect wires with a cross section of up to 2.5 mm2, their operating current reaches 24A, which allows you to connect a load of up to 5KW. The number of places in such terminal blocks is from 2 to 8, which greatly speeds up the installation of wiring as a whole. True, in comparison with twisting, they occupy more space in the junction boxes, which is not always convenient.
The design of the screw terminal blocks is shown in Figure 2.

Figure 2. Screw terminal block
This type of terminal block is the most common and therefore is used more often than other types. The main area of their application is the connection of wires in junction boxes. However, if the wiring is carried out with an aluminum wire, you should refrain from using such terminal blocks, since when tightening the screws it is possible to pinch and break off the soft aluminum wire.
The third type of mechanical wire connectors is connecting insulating clamps (PPE). Their appearance is shown in Figure 3.

Figure 3. PPE clamps
Such a clamp is a plastic case, inside of which there is an anodized conical spring. To connect the wires, they are stripped to a length of about 10 - 15 mm and stacked in a common bundle. After which PPE is wound on it, turning clockwise until it stops. With their help, it is possible to connect several single wires with a total area of 2.5 - 20 mm2. Naturally, the caps in these cases are of different sizes.
Such clamps accelerate installation, and due to the insulated housing do not require additional insulation. True, the connection quality is slightly lower than that of screw terminal blocks. Therefore, ceteris paribus, preference should still be given to the latter.
Solder connection
The connection of wires by soldering and welding is most reliable than using terminal connectors of various designs. Copper wires are best soldered, and although there are currently various fluxes for brazing aluminum, it is better to refrain from such soldering.
Compared to welding soldering is simpler and more affordable: it does not require expensive equipment, less fire hazard, the skills to perform good quality soldering will require more modest than when performing a welded joint.
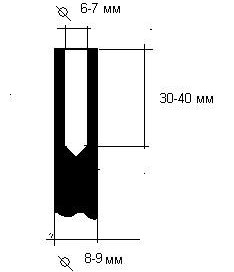
If you solder the twists from time to time, for example, you decide change wiring in your apartment, it’s quite possible to get along conventional soldering iron power not less than 100 watts. When the brazing of the strands is to be done almost every day, as regards your main or additional work, it is better to use the same 100-watt soldering iron after finalizing its tip, as indicated in Figure 4.
Figure 4. Refinement of the soldering iron tip
For such refinement, the soldering iron tip should be pulled out of the soldering iron body and grinded off with a file or cut off its working wedge-shaped part with a hacksaw. After this operation, drill a hole with a diameter of 6 - 7 mm to a depth of 30 - 40 mm in a copper sting.
Although special precision during drilling is not required in this case, if possible, it is better to cut the end and drill a hole on the lathe.
After installing the tip back into the soldering iron, the hole must be tin-plated from the inside, in the same way as for a simple soldering iron. Thus, a small-sized tin bath is obtained.
Before soldering, of course, the insulation is first removed from each wire to a length of 40..50 mm, and each individual wire is stripped to a metallic luster, and then tin-coated.
To do this, a small amount of solder should be melted in the hole of the soldering rod, then add a little rosin and immerse the wire in the hole. If there is any liquid flux, for example, a solution of rosin in alcohol, then simply lubricate the wire with liquid flux and dip the wire into the molten solder.
Then carefully twist the tinned wires, cut the ends at the same level and, taking them with pliers, dip them into the solder bath.
In such a device, it is possible to solder a twist of 4-6 cores with a cross section of up to 2.5 mm2. In this case, twisting should be held for about 3-4 seconds in order to completely warm up. The soldering should cool in air and have a brilliant contour appearance.
When using pine rosin as a flux, the soldered joint does not need to be washed. If other fluxes are used, proceed according to the instructions attached to them.
It is completely unacceptable to accelerate the process by cooling the solder with water: this leads to the formation of microcracks and, of course, to a deterioration in the quality of the joint.
Twist insulation is best done with shrink tubecorresponding diameter, warming it with a technical hairdryer. In the absence of a tube, you can use ordinary electrical tape by wrapping it in at least three layers.
See also: Welding wire connection
Boris Aladyshkin
See also at e.imadeself.com
:

