Categories: Electrician at home, Electrical connection of equipment
Number of views: 70493
Comments on the article: 2
How to install and connect a chandelier
Why a chandelier?
 When installing and arranging the lighting of residential premises, the uniformity of lighting is always in the first place for the consumer. That is why today they have become so popular. Spotlights, LED strips and tubes of neon light - their light is not concentrated at one point, does not hurt the eyes and eliminates the occurrence of shaded areas.
But with all this, the well-known to us chandeliers located on the ceiling in the center of the room have not lost their positions. On the contrary: the variety of forms and design designs of modern chandeliers is simply amazing. A chandelier can be an element of the interior, embodying the owners' desire for chic and external gloss. A chandelier can logically complete a hi-tech style room design; it can be brightly integrated into the interior of a children's room or create an atmosphere of comfort in the living room.
And, in the end, the need for general lighting of the rooms has not yet been canceled, and a more successful and beautiful solution to this issue than a chandelier has not yet been invented.
However, the installation of chandeliers has a number of specific features, which we will try to talk about.
How to install a chandelier?
The most popular way to install a chandelier today is hook. The chandelier hook is attached to the ceiling (real ceiling), for example, using an anchor or plastic dowels. It is unacceptable to mount the hook directly on the plasterboard ceiling: it may not support the weight of the massive chandelier. The same goes for the stretch ceiling, in which a hole is made for the cable outlet and the end of the hook. The location of the hole is pre-strengthened with a stick-on plastic ring.
Hook-mounted chandeliers, incorporate a constructive element, which can conditionally be called a "glass". The position of the glass on the central tube of the chandelier is adjustable in height so that the glass can hide a hole in the ceiling and terminal connections of cable cores. Instead of a tube, by the way, there can be a chain, a cable, or even the electric cord itself, if its insulation is reinforced and the weight of the chandelier is not very large (typical for single-lamp chandeliers).
 Another widespread group of chandeliers is ceiling mounted chandeliers. These are rigid structures, for the installation of which you must first mount a standard bar on the ceiling, which will take on the weight of the chandelier.
The plank is fastened according to preliminary marking with the help of two dowels and a pair of self-tapping screws, and already the base of the chandelier is attracted to it with screws, in which they also hide wire connections and which also hides mounting flaws on the ceiling.
Like a mounting hook, it is extremely undesirable for a chandelier bar to be mounted on a plasterboard ceiling or any other structure of insufficient rigidity. Therefore, if you plan to sew up the ceiling or if the ceilings are stretch, then for the chandelier on the mounting plate, you must prepare in advance a sub-base at the level of the sheathing in height. As such a base, a wooden block of suitable height may well be suitable. Accordingly, the plank will no longer be attached to the ceiling, but to the bar with ordinary wood screws.
But most importantly, of course, with all these installation and preparatory work - not to damage the cable, designed to connect the chandelier.
How to connect a chandelier?
 The most characteristic operation of the chandelier is to turn on one row of lamps with one of the keys of the two-key switch, and turn on the second row from the other key.Thus, it is possible to change the level of light intensity of the room depending on current needs, for example, "to read," or "to chat with a glass of wine."
For a three-wire line in which a protective conductor PE is provided, the cable for connecting the chandelier from the two-gang switch must have four wires. Two of them are phase, and the other two are zero, one of which is zero working, and the other is zero protective.
If the wiring in the apartment was made by competent electricians, then the working zero core will have blue insulation (white with a blue stripe), the zero protective core will be yellow-green, and the phase conductors are most likely black and brown. The wires coming from the chandelier should have the same color, and ideally it would be enough to connect the wires by color.
However, in life everything is more complicated. Aluminum wiring in apartments of Soviet construction, not only does it not have any protective zero in its composition, but its veins do not differ in color in any way. And this means that you have to deal with the wires using, for example, indicator screwdriver.
When both switch keys are on, there should be two “phases” and one “zero”, which does not respond with the flickering of the indicator lamp. We should not forget only about measures of basic electrical safety and take this matter with care.
Proven cores must be marked, and then you can go to the wires coming from the chandelier. If their color marking does not cause you doubts, and, for example, the manufacturer even applied a basic circuit diagram, then you can, as they say, not bother. But if there are doubts, then it is better to dispel them. For this using the terminal block connect suspected wires in pairs and alternately to a two-core cord with a plug, which we plug into a power outlet. Lamps, of course, should be in place.
Our task is to find two pairs, from which two different rows of lamps will light up, and which will have one common wire. With all confidence, we call this common wire zero, and the remaining two - phase.
For a chandelier controlled by a single-key switch, everything is much simpler. The phase and zero conductors in it are easy to notice, and nothing changes absolutely from changing them. The main thing is not to make a mistake with the zero protective conductor (if any) and put it on the chandelier body.
Some chandeliers, having in their composition a large number of lamps, have only two terminals for connection, that is, they are formally designed to be switched on only with a single-key switch. If the wire connections in such a chandelier are available for revision, then it can be converted to a two-gang switch. Then you need to disconnect the phase wires of one of the groups of fixtures from the common line and output separately.
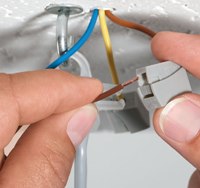
To connect the wires of the chandelier and the lighting line it is best to use insulated terminal blocks e.g. Wago. You can use screw clamps, for example, ZVI, if only the flexible ends emanating from the chandelier are pre-irradiated. If there is enough space for installation, then ordinary ones can be dispensed with. PPE caps. However, the same excess space is best used to maintain a margin of length of cores. Such a reserve certainly will not be superfluous.
A separate line can be mentioned chandeliers with compact halogen lamps, which may include an electronic step-down transformer. No terminal blocks are needed for such chandeliers - transformer terminals are enough for them. Moreover, some of these chandeliers have the ability to control a transformer with remote control. And this means that even for a step-by-step inclusion of a chandelier, a single-key switch will be quite enough - after all, all control will take place via a wireless line.
See also on this topic: How to connect a chandelier to a switch with examples and diagrams
Alexander Molokov
See also at e.imadeself.com
:
