Categories: Sharing experience, Electrical connection of equipment
Number of views: 37230
Comments on the article: 12
How to independently connect an electric furnace and a washing machine
1. Who will help?
 Household appliances are becoming more and more sophisticated every year. So "smarter" that when buying you start to doubt your mental usefulness. It seems that you are unlikely to really be able to master this miracle - you would remember how to turn on the simplest and most necessary set of functions, and the remaining gadgets will obviously remain without use. In addition, the idea arises that, since the technique is complex, it is as easy as spoiling or breaking it.
And when it comes to a washing machine or an electric stove, it must be kept in mind that they still need to be connected. Yes, and do it right. After all, an entry in the instruction manual explicitly states: “The connection must be made by qualified specialists. Otherwise, the warranty may not be valid. ” And the guarantee is our everything!
It was then that the store employees in which the equipment was purchased came to our aid. Their arguments are approximately the following: "for a small fee ...", "so as not to lose the guarantee ...", "qualification is needed ...". All is true, of course, but with some reservations.
Firstly, in practice, the refusal of warranty repairs threatens only if the malfunction is caused precisely by an incorrect connection. And it does not matter who made this connection - a qualified specialist or not. The only difference is that if you hired someone, you can make a complaint to him. And how effective these claims will be is another question.
Secondly, if you are already hiring specialists, it would be nice to get acquainted with the documents confirming their qualifications. At a minimum, they must have certificates of assignment to the electrical safety group. And, besides, documents on specialized education or, at least, certificate of completion of courses would not hurt. The peculiarity here is that many household appliance stores simply do not have such specialists on staff, and they perform the connection work ... ordinary movers and delivery drivers.
Thirdly, in order to spoil modern household appliances with the wrong connection, one must really try and even show talent. It must be remembered that the technique is made for man. And it is human nature to make mistakes sometimes. Therefore, the design of even the simplest kettle is designed in such a way as to minimize the likelihood of a fatal error. In other words, the technique protects itself and you as much as possible.
Given all of the above, we come to the following conclusion: you need to choose specialists to connect newly acquired household appliances very carefully, and best of all, if you are not afraid to pick up a screwdriver and pliers, do everything yourself, armed with this article and the operation manual (manual).
2. What is dangerous?
There are two dangers when connecting an electric stove yourself:
- get an electric shock;
- make a fire in the apartment.
If you carry out all work at a disconnected voltage, and your wiring complies with safety standards, then both hazards are excluded for you.
The norms here are:
- the electric stove must be powered from a separate circuit breaker for 25 - 32 A (three-pole for a three-phase network and single-pole for a single-phase);
- the cross section of the cable supplying the stove should be at least 2.5 square meters. mm for copper wire (4 sq. mm. for aluminum, but aluminum must be disposed of in the wiring);
- Well, of course, the wiring itself should be able to withstand an additional load of about 7 kW (depending on the model of the stove) - this is especially important if there was no electric stove in the apartment before.
When the washing machine is connected independently to the above two dangers, a third is added: the danger of a small flood on the scale of a single kitchen or bathroom. If we do not live on the ground floor, then there is also some responsibility to the neighbors below. It should be noted here that modern washing machines use energy and water very economically.
In addition, there is an electromagnetic lock on the doors of front-loading machines, which prevents opening during washing or rinsing. The machines themselves are equipped with an emergency valve to manually drain the water in the event of a malfunction. Therefore, wild scenes with bubbling streams and neighbors flooded several floors down, as in an advertisement for descaling, cannot be by definition.
To ensure electrical safety when connecting an automatic washing machine, remember the following:
- the socket for this unit must include a grounding contact, and the power cable - a third core (protective zero).
In any case, no matter what you connect to your home electrical network, the presence of such devices as a differential machine or RCD only welcome.
If the wiring in your apartment does not meet the minimum requirements listed, then you need to refine it. To do this, installing Soviet-made circuit breakers and pulling a new cable to the installation site is enough in Soviet-built residential premises. You can’t neglect this, and “store specialists”, in the pursuit of saving time and money, often do not pay any attention to it.
3. Connect the electric stove.
Electric stoves are single-phase, there are three-phase. The same three-phase plate can be included in both single-phase and three-phase networks. Single-phase plates are not included in a three-phase network.
If you are a happy owner of a three-phase network, then the cable going from the switchboard of your apartment to the outlet of the stove should be four-core (phases A, B, C and protective zero PE). In this case, the phase conductors can have any color: pink, black, brown, white, etc., and the protective zero can only be yellow with a green stripe. Three phases can reduce the current load on the network and use a cable of a smaller cross section. Since the cable is four-wire, then the pair “plug-connector” also must have four electrodes.
If the network is single-phase, then the cable will be three-core - phase L, operating zero N and protective zero PE. The phase and protective zero are the same colors as in the three-phase cable, and the working zero is blue, cyan or white with a blue stripe. Since the cable is three-wire, then the plug will be, respectively, with three electrodes.
A few separate words will be devoted to plug connectors. A full-time couple, the so-called “dad” and “mom,” may not be suitable for your network. You can buy the right one in almost any electrical goods store. The plug and socket, made according to Soviet standards, have a not-so-pretentious appearance and are inconvenient to install, however, they do not cause any complaints about the operation.
In addition to them, today there are a lot of other options for pairs of the most diverse design solutions. The choice is yours. Only the rated current will be crucial here. In practice, a plug pair with a rated current of 40 A is enough for any household electric stove.
Something needs to be said about the power cable, if you undertake to mount it yourself. When laying the cable in the gate (hidden wiring), the use of a flexible cable in rubber insulation is unacceptable. In any case, the VVG cable with the appropriate number of cores will be optimal.
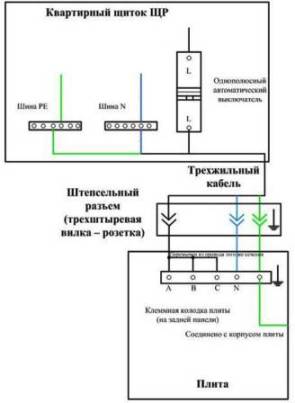
Fig. 1. Connecting a three-phase plate to a single-phase network. If the zero bus in the apartment shield is only one, and the line is two-wire, then the yellow-green wire is connected to the grounded housing of the shield of the ShchR.
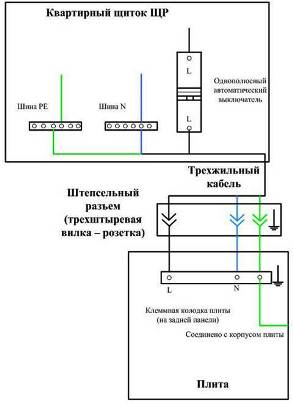
Fig. 2. Connection of a single-phase plate
4. We connect an automatic washing machine.
The most responsible and important task here is the choice of installation location and leveling of the washing machine. Some requirements are put forward to the floor and flooring. The floor must be hard, firm, even and not allow deflection or deformation. Old rotten plank floors are not suitable - it is better to place a sheet of plywood or any other even board of suitable size on them. To protect the coating and to prevent slipping, it is better to place a rubber mat under the machine, or at least just a piece of linoleum.
Before installation, it is absolutely necessary to remove all shipping parts - clamps, bars, bolts. Clamps fasten the power cord and drain hose. Bars and bolts fix the position of the drum. These parts are placed to give rigidity to the structure during transportation, and during operation they can even cause damage. It is better to save the removed elements - all of a sudden you will move or for some reason transport the machine to another place of residence?
It is best to check the position of the washing machine relative to the floor with the building level, well, and in the absence of one, you can use a wide-bottomed bowl by pouring a little water into it. The machine, which has not been horizontally aligned, will not work normally, since during the spin cycle its drum will vibrate strongly, up to impacts on the body.
Connecting the washing machine to the mains is usually not a problem. The nominal electric power of household washing machines is an average of 2.2 kW. This is not very much, so the washing machine can be connected to a conventional outlet with a grounding contact and a rated load of 16 A, especially since the machine itself is already equipped with a standard corresponding plug. Three-phase washing machines do not exist, therefore, they are all connected according to the circuit shown in Figure 2 for a single-phase electric stove.
Next, you need to organize water intake. To do this, you can use the standard point of connection to the cold water sink, shower or toilet: a tee is purchased in diameter of the pipe, and an inlet hose (also purchased separately) and the aforementioned sink / shower / toilet are already connected to it. Do not forget to use the reel and try not to overdo it - the bronze elements of the sanitary fittings easily burst from excessive efforts.
Of course, you can install the clamp on a pipe with cold water and arrange an autonomous water intake for the machine, but this will require additional labor costs (drilling a pipe, installing a clamp, etc.) - this is for your taste and according to the situation. Inlet hoses are available in various lengths - up to 5 m., And their connecting sizes are unified so that you don’t have to break your head here.
The regular drain hose of the washing machine is often not enough. Therefore, we purchase a drain hose (also sold in various lengths up to 5 m.), Build up a regular one with it, and organize a drain into the sink / bathtub or directly into the sewer. Moreover, the latter option is much preferable for a number of reasons. Firstly, dirty water after washing is clearly not in favor of plumbing and does not decorate the interior. Secondly, you may have to periodically remove the hose from the sink or bathtub, and where is the guarantee that you will never forget to put it back in place before washing?
In any case, when installing the drain, a number of rules must be observed. First of all, on the back of the machine on the clips you need to fix a loop from the drain hose (to the very top of the machine and down to the floor) - a siphon is necessary so that water and other amenities do not flow from the sewer back into the machine. Then, the drain itself should be located at a height of 50-80 cm from the floor level. This is necessary in order for the drain pump to cope with its task.
When installing a drain into the sewer, a tee is required. If the pipe and hose diameters do not fit together, you can use sealing couplings.
If the drain settles into a bathtub or sink, it is necessary to securely fix the drain hose, for example, using a plastic casing-hook.
5. Conclusion
In conclusion, we can say that not everything is as scary as it sometimes seems. And therefore, having only a little zeal and desire, it is quite possible to avoid unnecessary expenses for the services of dubious servicemen and gain peace of mind and confidence. Indeed, to the end you can be sure only of what is done with your own hands.
Alexander Molokov, http://e.imadeself.com/en/
See also at e.imadeself.com
:


