Categories: Featured Articles » Practical Electronics
Number of views: 98748
Comments on the article: 1
Electric soldering irons: types and designs
 Modern electronic technology is improving very quickly. The degree of integration of modern microcircuits is such that millions of transistors fit in a single case, but the cases themselves are becoming smaller and smaller. Discrete parts - transistors, capacitors, resistors are also small-sized, lead-free. All this is mounted on boards by SMD surface mounting. The parts are so tightly arranged that it is simply impossible to solder something with an ordinary forty-watt EPSN electric soldering iron.
True, some experts from the soldering iron claim that you can solder anything you want even with an ax. Maybe this is so, but, as they say, not everyone is given. Therefore, it is better, nevertheless, to use a soldering iron, since now there is a very wide selection of soldering tools. And to buy this tool you need to be creative, and not take everything that catches your eye.
First of all, it is necessary to determine for what work an electric soldering iron is bought. If you plan to solder massive parts, for example, automobile radiators, copper pipes, tin structures - in general, all that has a large heat sink will require a very high power hammer soldering iron. Such a soldering iron is often called an "ax." The power of such soldering irons reaches several hundred watts. A powerful ax-type soldering iron is shown in Figure 1.
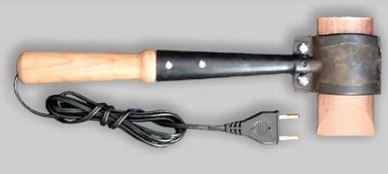
Figure 1. 200W Hammer Soldering Iron
Of course, the purpose of such a soldering iron is very specific, it may not always and everywhere be needed. A soldering iron with a power of 25 ... 60W is more suitable for domestic use. From time to time, they can perform almost all soldering work to repair household appliances and even solder printed circuit boards with output components. The appearance of such a soldering iron is shown in Figure 2.
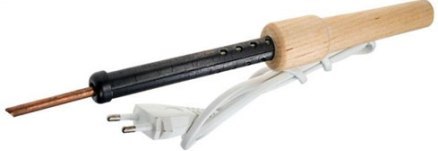
Figure 2. EPSN soldering iron
The design of such a soldering iron is non-separable, as described even in the instructions attached to it. You can say about this soldering iron that its heater is quite durable, it burns out very rarely, even if you use the soldering iron very intensively. It often happens that a copper sting burns and is welded inside the heater so firmly that it is simply impossible to get it, in this case you have to purchase a new soldering iron.
To prevent this from happening, it is recommended to periodically remove the tip from the soldering iron and clean it of oxidation products. In this case, black powder spills out of the soldering iron itself. All this is good when you read, but in most cases they just forget about it, and they still throw away a completely working soldering iron.
Before using a new soldering iron, the tip of the tip should be tin-coated. To do this, first you need to heat up the soldering iron, and then hot remove the oxides with a small file, quickly dip the cleaned end into rosin, and then into the solder. As a result, a drop of solder remains on the working surface of the sting. If this is not done, then the sting will turn black and simply will not succeed in melting the solder.
In the process, the copper sting gradually dissolves in the solder, and shells form on it and oxides appear. It becomes impossible to work with such a sting, and again it is necessary to correct it with a file and service it. And so on until a small piece remains of the sting. This sting should be changed.
A slightly smaller sting will burn out if it is hammered to the desired shape before use: on the surface of a copper sting a riveting, harder layer of metal is formed. It is this riveted layer that is more resistant to fading.
Home-made designs of electric soldering irons
Sometimes it happens that a soldering iron, even with a power of only 25W, is too big to solder a small part. In this case, the copper wire wound around the tip can help, as shown in Figure 3.
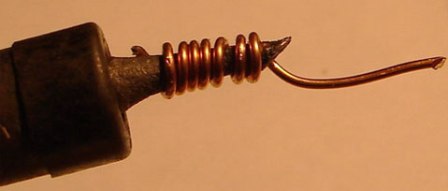
Figure 3. Reducing the size of the sting by winding copper wire
Such an impromptu sting should first be irradiated, as was written just above. Of course, this design is short-lived, but it is enough to make a few rations.
At one time, radio amateurs proposed many designs of miniature electric soldering irons. Many of them were even very good, but, unfortunately, some lathe and metalwork were required to make them. At home, making such a soldering iron is simply impossible.
But our people, having shown a creative approach, invent miniature soldering irons from improvised means. Two of these designs were published in Radio magazine No. 1 2011. The first of them is shown in Figure 4. It was based on a wood burner, which many used in childhood.
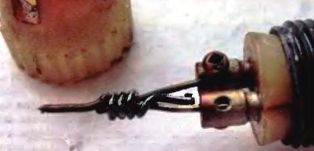
Figure 4. Soldering iron from a wood burner
The design of the soldering iron is clear from the figure. It is enough to tightly wind a copper wire with a diameter of a millimeter and a half on the burner spiral and, of course, to irradiate, after all, after all, a soldering iron! The resulting impromptu sting is very similar to the design shown in the previous figure. The author of the soldering iron O. Ivanov from the city of Vladimir.
The indisputable advantage of this design is that the temperature of the burner is adjustable, which means that it is possible to adjust the heating temperature of the resulting soldering iron.
The author of another impromptu soldering iron A. Filippov from p. Nyuksenitsa of the Vologda region. The design of the soldering iron is shown in Figure 5.
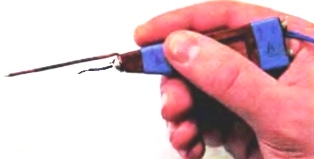
Figure 5. Improvised soldering iron A. Filippova
As a soldering iron tip, a copper wire with a diameter of 1.6 mm and a length of about 60 mm is used, on which a “spiral” of PEV-2 copper wire with a diameter of 0.16 mm is wound. The winding is made round to round, departing from the sting by 8..10 mm, the length of the winding is approximately 35 mm. Before the first inclusion, the role of inter-turn insulation is performed by the enamel with which the wire is covered.
After burning the spiral, the role of insulation is played by the oxide that appears on the wires, which is quite enough at a low supply voltage. The reverse end of the soldering rod is bent by a ring and is attached to the hard rubber handle with one screw. The supply voltage is supplied by a flexible wire with a cross section of at least 0.75 mm2.
Soldering iron should be fed through adjustable current stabilizer with galvanic isolation from the network. At a supply voltage of about 5V, the consumed current is in the range of 2 ... 2.5A, which ensures sufficient heating of the copper "spiral". With these parameters, the power of the soldering iron is P = U * I = 5 * 2.5 = 12.5W.
Given that the burnout current of a copper wire with a diameter of 0.16 mm is 6A, the design is quite durable. The author claims that he has been using such a soldering iron for several years, although at first the design was conceived as a disposable one.
Home-made electric soldering irons are becoming a thing of history, as the Chinese industry has now mastered a very wide range of soldering equipment. You can buy any soldering iron for any purpose. Soldering irons, first of all, differ in the design of the heater.
Ceramic and Nichrome Heaters
When buying an electric soldering iron, consider the type of heater.
A nichrome heater is a spiral wound on a ceramic base into the inner hole of which a soldering rod is inserted. Some of the most advanced heaters have integrated thermocouple, allowing to stabilize the heating temperature. The design of the nichrome heater is shown in Figure 6.
Figure 6. Nichrome heater
A non-combustible soldering rod is also shown here. It itself, of course, is made of copper, and on the outside it is covered with a layer of nickel.In no case should such bars be filed with a file in order to irradiate, although many users complain that such stinging is poor, they do not hold solder on themselves.
There is nothing left how to solder only with solder supply: a soldering iron in one hand, a thin wire of solder in the other, and a board under them. And then say that under an undeserved sting, the solder melts poorly. Classic soldering According to the method, he dipped the soldering iron into the solder, grabbed a drop, transferred it to the board, impossible in principle.
What is the problem here, and how to solve it? This is described here: How to irradiate a fireproof sting at a hairpin
Modern soldering irons are produced mainly with ceramic heaters. The production technology of such heaters is quite complicated, and mastered by several famous companies. First of all, these are the just mentioned company Weller, Hakko, Ersa and some others.
Ceramic heater is very durable. If a conventional nichrome heater when soldering on an industrial scale (several thousand rations per shift daily) becomes unusable after some six months, then ceramic heaters serve for years, of course, on condition of careful use.
The main advantage of ceramic heaters is a high heating rate: the soldering iron reaches the operating mode in just 30 seconds. In principle, it is not particularly important how soon the soldering iron warms up the first time it is turned on. This speed is important for the operation of the thermostat, because the faster the tip is heated, the more stable the soldering temperature.
Figure 7 shows an Ersa TechTool soldering iron heater for use in soldering stations.
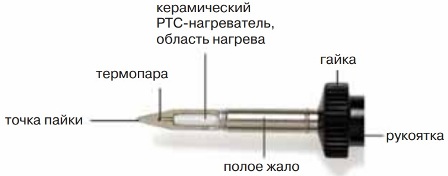
Figure 7. Ersa Ceramic Heater
It is easy to notice that the heating region of the ceramic heater is at the end of the hollow sting, therefore it is mainly the part that is closer to the soldering point that is heated. Very close to the soldering point is a thermocouple. This arrangement of the thermocouple provides a quick response of the electronic unit even to minor temperature changes at the soldering point. This is where the high heating rate of the ceramic heater affects it.
Replacing the tip is carried out using a plastic corrugated nut that remains cold even when the soldering iron is heated to 400 degrees. This allows you to replace the tip in just 30 seconds, without waiting for the soldering iron to cool. Here is such a high-tech thing ceramic heater.
TechTool soldering iron is expensive. Even his offer in online stores "at low prices" results in the amount of 7750 rubles (without an electronic control unit). Where they are not seduced by low prices, this soldering iron can be bought for 8,257.00 rubles. But radio amateurs should not be afraid of such prices, since these are the prices of professional-grade soldering irons designed for continuous work on a whole shift.
For amateur purposes, you can choose less expensive Ersa models, for example, a soldering iron with a temperature controller PTC 70, the appearance of which is shown in Figure 8. Even at not the cheapest Chip and Dip store they ask for 3,710 rubles, which is not a good tool so expensive.

Figure 8. Soldering iron with temperature control PTC 70
For not very frequent use for amateur purposes, a Chinese-made soldering iron is quite suitable: let it be a little worse, but the price is good.
Replaceable stings are put on a ceramic heater and are held by a spring latch. An analog temperature stabilizer is hidden in the handle of the soldering iron, the sensor of which is the heating element itself, since its resistance varies with the heating temperature.
By the way, such temperature stabilizers are offered in amateur radio designs for conventional EPSN soldering irons. The temperature adjustment wheel is brought out to the soldering iron handle, as shown in Figure 9.
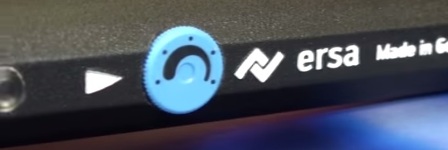
Figure 9. PTC 70 Soldering Iron Temperature Setting Knob
Soldering iron supply voltage 220V, heater power 75W. With these parameters of the ceramic heater, the tip temperature will be kept very stable, the soldering iron will not stick to the board, because the more powerful the heater, the faster the tip will heat up.
Such a soldering iron can solder thin tracks of printed wiring and large enough parts without fear of overheating or cooling of the soldering iron. For a soldering iron there is a whole set of tips suitable for different soldering work.
Some manufacturers hide the thinnest nichrome spiral inside a ceramic cylinder and call this heater ceramic. Maybe this is such a commercial trick, but the heater is still nichrome. In a real ceramic heater, the ceramic itself is heated.
Soldering irons with such a heater are often also carried out with a thermostabilizer in the handle, but there are also without it. Some models have a built-in thermocouple, you can use them only if you have an external electronic unit. Such kits are called soldering stations.
The scheme is quite simple and easy to repeat. The signal of the thermocouple built into the soldering iron is amplified and fed to comparator. As soon as the thermocouple voltage reaches the set level, the heater turns off. A digital indicator is used to indicate the set temperature, although, in principle, you can do without it. The beauty of this design is that you do not need to program a microcontroller, which is simply not in the circuit.
The article provides a detailed description of the circuit, recommendations for commissioning, drawings of printed circuit boards. All this will help to assemble such a soldering station quickly and easily. The appearance of the author's version of a homemade soldering station is shown in Figure 10.
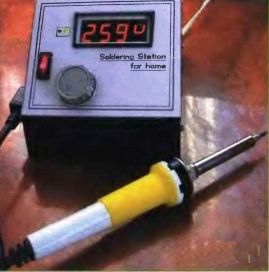
Figure 10. Appearance of a homemade soldering station
Soldering Iron Tip
Modern soldering irons are equipped with a whole set of interchangeable tips suitable for all occasions. One of these kits is shown in Figure 11. The appearance of the SR971 soldering iron is shown in Figure 12.
The sale soldering iron is equipped with only one conical tip, so you have to buy the remaining tips additionally. The power of the ceramic heating element is 25W at a supply voltage of 220V. The soldering iron tip is grounded, which allows soldering elements sensitive to static electricity. The replacement tip is easy to install, which allows for various soldering work. To do this, it is enough to unscrew the nut with the knurled surface, change the sting and screw the nut back.
The shape of the handle of the soldering iron is quite ergonomic, the weight of the soldering iron is small, it is quite comfortable to work with such a tool. The only thing that somewhat overshadows all the advantages is the lack of a built-in power regulator.
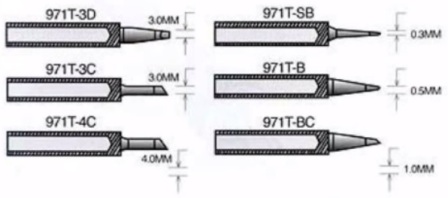
Figure 11. Set of replacement tips for SR971 soldering iron with ceramic heater
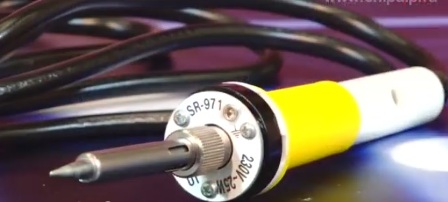
Figure 12. Soldering iron from SOLOMON SR971
When working with SMD components, it’s not at all worthwhile to have a “plug” type tip and a mini-wave tip: the first one is designed for soldering small things like resistors and capacitors, and the second allows soldering multi-pin parts in planar cases without fear that the solder will fall between the terminals.
Figures 13 and 14 show fragments of a table with Weller tips, from which you can select and order the desired tip. In addition, Weller protects its stings with laser engraving, since there are enough firms to fake the original stings.
The use of such counterfeit Chinese stings often makes soldering equipment unusable, and Weller soldering irons are very expensive. Even those who are engaged in soldering at a professional level do not always dare to buy such equipment.

Figure 13. Tip type plug
It’s even very convenient: you bring such a sting to the resistor, both ends are heated immediately, and it remains only to remove the part from the board.
For such operations in the arsenal of soldering equipment there is a special tool - thermal tweezers. You can immediately heat the part and remove it from the board. In fact, these are two soldering irons combined in a common design. Such an instrument is very expensive, but, as practice shows, you can do without it.
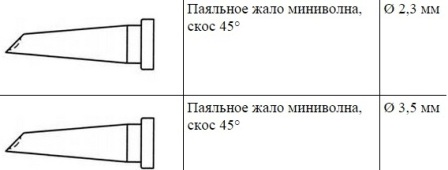
Figure 14. Sting type “minivolna”
On the working surface of the sting there is a small spherical recess (shown by a dotted line), where molten solder is collected. Next, a sting is carried out on the conclusions of a planar microcircuit, naturally installed on the board, and the supply of solder flows to the conclusions and tracks of the board.
It’s very convenient, you don’t have to poke separately into each output of the microcircuit, everything turns out as if by itself. This technology increases the productivity of manual soldering by at least ten times, and also improves the quality.
It would seem that such a sting can be elementarily made of ordinary copper: there is nothing to do but drill a small and not very deep hole in the right place. But just these small sizes will lead to the fact that such a sting will quickly burn, there will be no trace of a tiny hole. But if there is a need to solder one or two microcircuits, then such a sting is quite suitable.
The proprietary "minowave" (as an option "microwave") is made with a non-burning chrome coating, and the tip of the sting is chemically tinned. The wettability of such a sting is magnificent, which is perhaps the most important condition for high-quality soldering.
The installation and dismantling technology of microcircuits in planar housings is described in sufficient detail in an article by V. Barinov “Installation and dismantling of microcircuits in small-sized housings with planar leads”. The article was published in the journal Radio 1, 2010, p. 25.
Induction Soldering Iron
All the soldering irons discussed above use heaters of various types, the heat from which is transferred to the soldering iron tip, and an electronic circuit is required to stabilize the temperature. Induction soldering irons are arranged in a completely different way, in which the sting itself is heated by high-frequency currents and serves as a heating element. And no ceramic or nichrome heater is needed. A schematic diagram of an induction soldering iron is shown in Figure 15.

Figure 15. Induction soldering iron device
The soldering rod is made of copper, and its back is covered with a ferromagnetic alloy of iron and nickel. On this part of the tip is an inductor, powered by a voltage with a frequency of 470KHz. High-frequency oscillations induce surface currents in the core that heat the iron-nickel coating, which has magnetic properties and a sufficiently large electrical resistance compared to copper. The combination of these properties leads to heating of the ferromagnetic coating.
The heat from the heated layer heats the entire core, goes inside, cooling the ferromagnetic layer, because inside the core there is copper! The coating is heated until the temperature of the entire core reaches the Curie point. This is the temperature at which the ferromagnetic coating loses its magnetic properties. To put it more simply, an ordinary iron nail, at an appropriate temperature, will no longer be attracted by an ordinary permanent magnet.
With the loss of magnetic properties, the surface effect ceases to act, and high-frequency currents go inside the copper core, where they do not cause any heating. Since copper does not respond to magnetic fields, the absorption of energy from the magnetic field ceases, and core heating also stops, since the tip temperature reaches the Curie point.
During the soldering process, the tip gives up the stored heat to melt the solder and heat the soldered parts. The tip temperature drops below the Curie point, the magnetic properties of the coating are restored, and heating begins.Moreover, the more massive the soldered parts, the faster the core tends to cool, the farther away from the Curie point, the higher the influence of surface currents.
In other words, the heating power, its speed adapts to the soldering conditions: the more intensively the heat stored by the sting is taken, the more intense the sting is heated. No wonder this heating technology is called Smart Heat, which can be translated as “smart heat”. The development of an induction soldering iron, as well as the Smart Heat technology itself, belongs to the American company Metcal.
The beauty of this technology is that it does not require complex electronic circuits to maintain the temperature, because it is no secret that the most advanced soldering stations are controlled by microcontrollers and have fairly complex circuits. And then everything happens due to the soldering sting itself! It is enough to power it with high-frequency voltage.
And here a question may arise: solders can be used different, each has its own melting point. How to change the tip heating temperature for a specific type of solder?
It turns out that everything is simple. The soldering iron is equipped with several cartridge tips, each at its own temperature, which depends on the chemical composition of the ferromagnetic coating. Simply take another cartridge, and use the connector to insert it into the handle of the soldering iron.
Cartridges of the 500, 600, and 700 series are mainly used. These numbers indicate the heating temperature on the Fahrenheit scale. Each series has a set of tips of various shapes, suitable for all soldering work. But with the Curie point, soldering irons are not only induction.
About fifteen years ago, soldering irons with a mechanical temperature controller were already produced. They have the most common nichrome heater, but at the rear end of the soldering rod there is a small ferromagnetic tablet, to which a magnet is drawn that controls the operation of the microswitch. As soon as the tip is heated to operating temperature, to the Curie point, a click is heard inside the soldering iron, and the heater turns off. With some decrease in temperature, the contact clicks again, the sting begins to heat up.
In order to change the heating temperature, a few tips with different Curie points are included in the soldering iron kit.
Other soldering iron designs
The story about soldering irons will be somewhat incomplete, if you do not mention other, one might say, exotic types. First of all, these are autonomous soldering irons that do not require a connection to electricity. Some of them still consume electricity from the battery or even batteries built into the pen.
Other gas soldering irons work like an ordinary gas torch, they only heat the soldering iron tip. If the sting is removed, then it turns out just a gas burner.
By their “soldering” properties, gas soldering irons barely reach the best electric soldering irons. This is indicated by everyone who has ever used this miracle of technology.
The only advantage of gas and any other autonomous soldering irons is independence from electrical wiring: you can solder something even in a clean field. But, thank God, such exercises are not often done. Therefore, it is better to use an electric soldering iron.
Boris Aladyshkin
Read also on this topic: How to choose a soldering station
See also at e.imadeself.com
:

