Categories: Practical Electronics, Repair of household appliances
Number of views: 195497
Comments on the article: 41
DIY remote control repair. Part 2. Repair Tips
 The first part of the article was told about the history of the emergence and development of remote controls (remote control) for controlling household television equipment.
Despite all the technological breakthroughs, increasing the speed and number of teams, improving the design and noise immunity of the remote control, this is perhaps the most vulnerable node of the body and video equipment. It is he who gradually or immediately ceases to work, leading the hosts to bewilderment. Next, various typical malfunctions of remote controls and methods for their elimination will be considered.
The TV does not respond to any of the buttons on the remote control
The question immediately arises - what to do and who is to blame. Undoubtedly, it is necessary to start the verification with what is simpler, namely with the remote control. First of all, you need to check if the remote control works at all. It is very easy to do. It is enough to bring the remote control LED to the camera lens, which is in any phone, and press any button. In this case, the flashes of the remote control LED will be noticeable on the viewfinder screen. Color can be from white to bluish, everything, apparently, depends on the camera.
If these flashes are, then we can assume that the remote control is almost serviceable. Pressing all buttons in turn allows you to check each button individually. Before doing this test, it is advisable to check the batteries. The easiest option is to replace the batteries with new ones or check the available ones with a multimeter.
Multimeter Battery Check
This is best done in the DC current measurement mode over the 10A range. At lower limits, it is possible to “burn off” a 250mA fuse inside the device. Unlike batteries, batteries are not afraid of short-circuit, and if it is possible to measure the current within 200..500mA, then everything is in order. Testing is best done separately for each battery, as it is easier to hold it in your hands along with the probes of the device.
If you measure the voltage on the batteries, then you need to load them, otherwise even unusable batteries can show the presence of voltage. In the process of checking - replacing the batteries, pay attention to the contact plates in the battery compartment. If oxide deposits or rust are detected, the plates should be cleaned with sandpaper or not even a very large file.
To avoid scandals at home, the number of TVs must be at least two. This is the best option for checking a “suspicious” remote control. Well, it’s probably known that the remote controls are suitable (or not suitable) for both home TVs.
If the batteries were changed, the camera looked, and there were no light pulses from this, then the remote control will have to be disassembled.
A small remark: if the normal operation of the remote control stopped immediately after it was dropped to the floor, then first of all after disassembling it is worth paying attention to the ceramic resonator.
Disassembling the remote control
All remotes are arranged and disassembled quite uniformly. The first thing to do is remove the batteries from the battery compartment. In the same compartment, carefully see if there are mounting screws here, as a rule, this is their place. But often there may not be any screws at all. In this case, you can start dividing the remote into two halves.
For this, a suitable tool, such as a screwdriver, is slipped into the connecting seam. Some descriptions of such a procedure say that traces of chips and scratches may remain from the screwdriver. Therefore, it is safer in this regard to use a regular credit card, which in unlimited quantities are issued in any “magnet” or “pair”. The main thing is to get successfully to the first latch without breaking it, and then gradually and accurately open the rest.
After the remote control is open, the lower part can be set aside for now. At the top, the entire console will remain. The remote control with the bottom cover removed is shown in Figure 1.

Figure 1. Remote control with cover removed
Here we see the back of the circuit board. There is an IR LED on the left side, and the yellow square in the lower right corner is nothing but a ceramic resonator. Here are the contacts of the battery compartment and the only electrolytic capacitor on the entire console.
If during the check with the camera no signs of life were found, then you should immediately check the appearance of the LED and the resonator, inspect their solders. If they are oxidized or have ring cracks, then they should be re-soldered. It’s better not just to pierce with a soldering iron, but to remove these parts from the board, strip and tin the conclusions, and only then put them back in place.
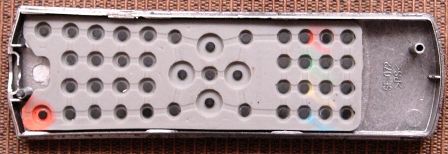
If the printed circuit board is removed from the case, then under it there will be a rubber base with buttons, as shown in Figure 2.

Figure 2. The buttons, when pressed, close the pads on the circuit board.
The board on the part side is shown in Figure 3.

Figure 3. Remote control board
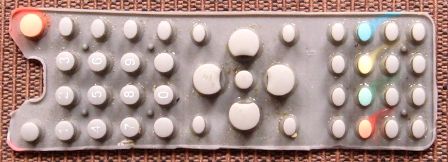
Figure 3 shows the upper part of the rubber base; button pushers are located on it.

Figure 4. Upper part of the rubber base with remote control push buttons
Mentioned pushers during assembly of the remote control are inserted into the sockets of the top cover (Figure 5), while being a fixing element of the rubber base.

Figure 5
In the figures, everything is shown fairly decent and clean, since shortly before that, the console underwent minor repairs. As a rule, any remote control opened for repair is a sight rather pathetic and even heartbreaking.
What can be seen inside the remote
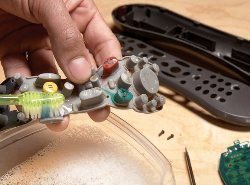
The entire space where the rubber base with buttons is located is filled with a transparent sticky and viscous liquid that looks like an epoxy resin, but without hardener. This liquid is smeared with a neat thin layer, in places with small droplets. Even if you try, it’s not so good and accurate.
This sticky liquid is everywhere. On the upper and lower sides of the rubber base of the buttons, on the upper part of the housing with slots for buttons. The upper part of the printed circuit board with pads is also coated with this glue ...
The origin of this glue is the subject of discussion and even debate in the circles of repairmen. Some say that it is fat from the fingers of the hands, others that it is battery vapor. But why then the bottom of the board, where there are no parts, is not covered by these fumes?
The most likely version seems to be that these sticky compounds come from the rubber base itself. Rubber sweats, as it were, releasing plasticizers from itself, which indicates a violation of the technology for the production of rubber products. The only question is, why are there so many such substandard products? Indeed, in almost every remote control that gets into repair, it is precisely such a defect that is noticed.
These evaporated plasticizers are most often the cause of the failure of the remote control. Outwardly, such a defect manifests itself in the fact that the buttons cease to be “pressed”, you have to increase the applied force, but after a while this also does not lead to the passage of commands. You can reap as much as you like, for a long time, several times, but the channels do not switch, the volume is not regulated ...
Several repair methods
There are many recipes, tips and opinions on how to deal with this phenomenon. One source advises immediately to wipe all this disgrace with alcohol, gasoline or acetone, another says that in no case. Who to believe? I will share my own poor experience in the field of remote control repair; there were few clients, mainly relatives, neighbors and acquaintances, but the simplicity of the device and the repair allows us to draw certain conclusions.And if you still listen to what they write on the Internet ...
Once cleaning such a remote control with alcohol led to its complete failure. If just a few buttons (apparently the most frequently used) worked poorly before cleaning, then almost everything stopped working. Therefore, I had to resort to another repair method, but it was postponed in my memory that these buttons cannot be washed with alcohol.
A much better result, if the board has such a snotty look, can bring washing the board and rubber bands with buttons with not very hot water using a modern dishwashing detergent. It should be noted that one can also overdo it: if you wash the rubber base with very energetic movements and press harder, the result can be exactly the opposite. The graphite coating from the buttons will be washed off, and then you can press them later as much as you like, at the same time, without any fear that pressing the button will cause a channel switch or volume control.
If the graphite coating has not been washed off before, then it should be washed with a soft cloth, with gentle, soaking movements that will never erase the graphite coating. The inside of the case and the circuit board are best washed with a brush used to wash glass jars and bottles. It is very good if, before washing the snotty coating, the parts of the disassembled remote control for some time, 20 ... 30 minutes, lie in a detergent solution.
After washing, you should be patient, wait until the parts are dry and only after that assemble the remote control in the reverse order. If such a flushing gave a positive result, the remote control has earned, you can only rejoice at the result. Otherwise, you can offer several more repair methods.
What to do if the buttons are worn to the ground
Exits already exist for these situations: repair kits for repairing the remote control are sold. The bag contains a tube of glue and a tidy rubber patch with graphite coating. Just spread and paste where necessary. There are even instructions on how to stick. A more modern version of the repair kit is self-adhesive patch. Everything is very simple here. But in such cases, just rubbing the rubber buttons with alcohol or another solvent will not hurt.
But, unfortunately, it is not possible to buy such semi-finished products everywhere and not always, although the price of the question is simply ridiculous: where are we and where is the radio market ... In these cases, you have to use various improvised means. One of the best and most affordable materials is aluminum foil with a paper base of cigarette packs. It is glued quite reliably and simply with any glue of the “Moment” type or with super glue from small tubes.
Another option for repairing the remote control is to smear the buttons with conductive adhesives and varnishes, for example “Contact” or “Ellast”. Regarding this method, there are also many different opinions, which is not yet clear. Apparently, everything is simple: whoever worked out well praises and vice versa.
Of course, current prices for remote control are not large, and easier than to invent something, go and buy a new one. But it happens that the TV is so old that no modern remote control is suitable. Most likely it's time to buy a new TV with the remote control. Or still repair the old remote.
Boris Aladyshkin
See also at e.imadeself.com
:
