Categories: Featured Articles » Sharing experience
Number of views: 20685
Comments on the article: 14
How to bring to mind a cheap extension cord
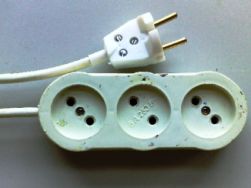 The article provides a real-world example of the refinement of a cheap extension cord by amplifying electrical contacts and replacing a wire. The result is a good and reliable extension cord, in no way inferior to expensive analogues.
Currently, more and more portable electric appliances and tools are being produced. These are electric drills, grinders, jigsaws, screwdrivers, scissors and the list goes on and on. For them, often for work, extension cords are required. And there are plenty of this product in today's market: from cheap to expensive.
Extension cords, which are more expensive, can meet all the necessary requirements, but which are unlikely to be cheaper. But once they are, then naturally the people also buy them. Maybe because they don’t know which ones are better, which are worse, or maybe for financial reasons. And once having bought a cheap product, it ceases to work normally, namely, as they say - "phase, that is, it is not there."
The main reason that a cheap extension cord does not work well is poor contact between the plug and the outlet. Working with such an extension cord can be annoying even for non-irritants. Do not rush to throw out such an extension cord, it can be “brought to mind" and after completion, it will not give way to expensive ones in its parameters.
For example, I just have such an instance: a cheap extension cord - a wire length of three meters, a cross section of 0.5 mm2, a cassette of sockets for three consumers - "makes a bad" contact.
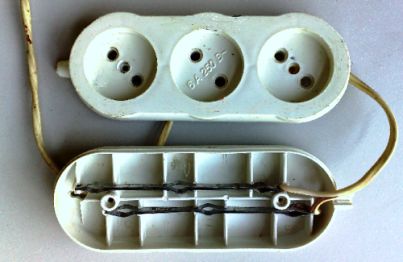
First, remove the top cover of the sockets. There you can see two rows of contacts, which are: two independent copper strips, with roundings for the plug electrodes, inserted into special grooves so as not to “disperse”. With this design, it is hardly possible to achieve hard and reliable electrical contact.
We take out all these parts and solder the power cord (if it is soldered). We take one group of contacts, put them together - how they should stand in the case. And we wrap places between roundings with sticky insulating tape 2-3 turns. Now these parts do not crumble, then the ends of these contacts are well tin-coated with a soldering iron.
Then, the tinned ends are wrapped with a single-core copper wire with a cross section of 0.3 - 0.5 mm2 and soldered to the tinned places. Next, we will replace the extension cord itself with a larger cross section. I have a piece of 2.5 meter left from a recent installation - three veins and a section of 2.5 mm2, so I'll use it for the future extension cord. I will use all the wires, which means one of the wires will have a larger cross section. We clean the tips and solder to the edges of the contact groups and the resulting structure, already monolithic, is inserted in its place.
Until you close the lid, you can try how the plug enters the outlet, if there are any inconsistencies, you can adjust and correct the rounding in the outlet. I assure you, the contact will be tight enough - the plug will be inserted tight enough into the outlet. After making sure that everything works “correctly, close the lid. It remains on the other end to put a good fork.
You can also wrap the places that were wrapped with electrical tape with a copper wire (bandage) and also solder it. Insulating tape - a kind of indicator, after prolonged use, you can look at its condition by removing the cover from the outlet.
And a little parting word: since the “ours and euro” forks differ in the diameter of the electrodes, then for the “our” forks, define some place, marking it in some way. Here is such an option for revision. This is my personal one, I think there are plenty of such craftsmen.
I took some moments for clarity, if there is something not clear in the text.
Socket before the upcoming revision.
Here is the factory-configured outlet:
We wrap the sections in the middle with electrical tape:
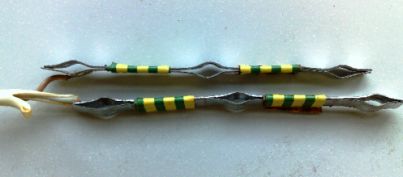
We wrap the middle sections with tape. So it looks after the changes:
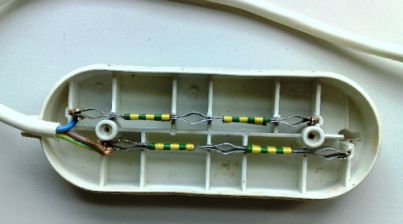
These were the contact parts. It turned out a good and reliable extension cord.
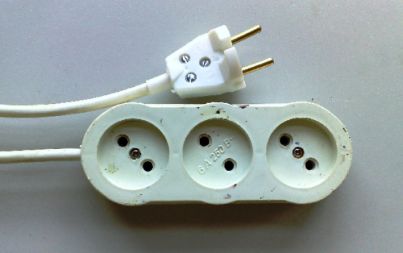
Here's the extension cord. Maybe someone will take my advice.
L. Ryzhenkov
See also at e.imadeself.com
:
