Categories: Sharing experience, Electrician at home, Home automation
Number of views: 499613
Comments on the article: 35
How to connect the motion sensor to control the light
The first association that comes to mind with the phrase “smart home” is the automatic inclusion of light in a room when a person appears there and the automatic lighting off when people exit this room. In this article I will give detailed instructions on how to create such an automatic inclusion of light with your own hands, making your home a little smarter.
To implement this idea, the LX-01 motion sensor was taken. The principle of its action is simple - when there is movement in the detection zone, it closes the circuit, thereby including devices connected to it. In the absence of movement, the circuit automatically opens, turning off all devices.
The motion sensor also has the ability to configure, there are three of them - the time interval for switching off, the level of illumination and sensitivity. The time interval for shutdown sets the time during which the sensor will work since the last motion detection. Values are set between 5 seconds and approximately 2 minutes.
The level of illumination is needed for the correct operation of the sensor during daylight hours. When motion occurs, the sensor determines the level of illumination, and if it is below the threshold, the sensor is triggered, if higher, the sensor does not work. It is logical - why in the afternoon in the already lighted room with natural light to turn on electric lighting?
With the last setting - sensitivity - I think that everything is clear and without a description. The higher the sensitivity, the better the sensor responds to movement. If the sensor triggers too much, then the sensitivity is better reduced.
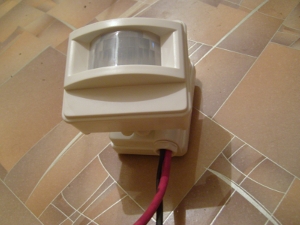
It should be noted that there are a lot of sensors in general and motion sensors in particular now. Each species is suitable for a specific task. So the motion sensor described above is best suited for installation in a corridor or any other room where people often pass without being delayed for a long time. This is explained primarily by the principle of operation of the sensor - it responds to movement. For this reason, installing it in a toilet or in a bathroom is a bad idea. Otherwise, each time you take a bath, wave your hands or make other body movements to constantly illuminate the room. Agree, this is not very convenient. So, we decided on the choice of room. Now we proceed to the choice of the location of the motion sensor.
When installing a motion sensor, it is important to consider the parameters of the room. The location of the doors, the main ways of moving people - all this has a significant impact on the choice of location for installation. In my case, the corridor had the following layout:
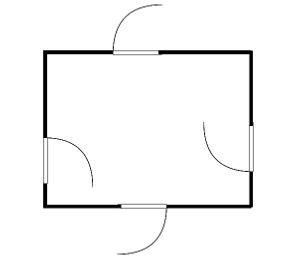
It can be seen that there are 4 doors in the corridor and there are no windows. The lack of windows in this case is even at hand - you don’t have to adjust the sensor to various lighting levels, the sensor will work well with every movement in the room, regardless of the time of day. There is one door on each side, this complicates the task somewhat, since it is necessary to control all 4 doors at the same time so that the person who entered does not end up in the dark. Since the sensor has an overview of 120 degrees, it was decided to install it in the corner of the room (after all, as you know, the right angle is 90 degrees). Installation in the middle of the wall in this case is not suitable, since this will lose sight of the door in this wall. So, with the location of the sensor, we decided:
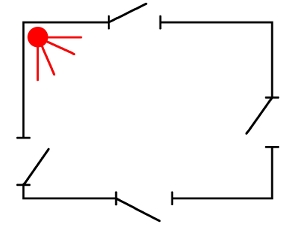
Now you need to decide on the connection of the sensor. The connection diagram is shown below:
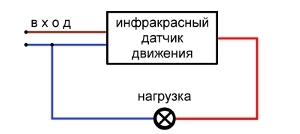
Despite the fact that we connect the sensor to the network with phase current, it is impossible to connect the wires to the sensor otherwise than shown in the diagram - one sensor was safely burned after it was incorrectly connected to the network.
It may be useful in some cases to leave a control switch that will act in parallel with the motion sensor. For example, you need for some reason to keep the lights on in this room for a long period of time in the absence of people. To do this, you must connect a standard light switch in parallel with the sensor. The connection diagram will change and will already look like this:
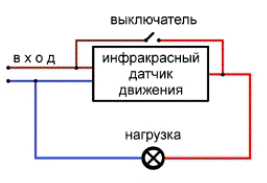
Such a connection will make it possible to keep the light on for an arbitrarily long time when the switch is turned on. A kind of "emergency mode". The rest of the time, the switch must be in the “off” state, in which case lighting control completely moves to the motion sensor.
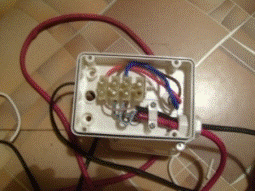
Using the tester, we call the wiring and find the wire passing from the switch to the lamp. From it we pull a new wire to the red contact of the sensor. Next, take the wire on the other side of the switch and pull the wire from it to the brown contact of the motion sensor. After that, you need to take a wire suitable for the lamp (lighting device) on the other side (not from the switch side). From this wire, we make contact to the terminal with the blue wire of the motion sensor.
Important! Carry out all wiring work with the electricity turned off in the house. At the same time, observe all safety precautions when working with electrical wiring. Be sure to insulate all exposed sections of the wiring, double-check the connection.

After connecting all the contacts, you can assemble the motion sensor and fix it in the selected place. In our case, a special metal corner was made with the corridor, which was fixed at an angle of 45 degrees to the walls in their place of contact. Further to this corner, a motion sensor was attached.
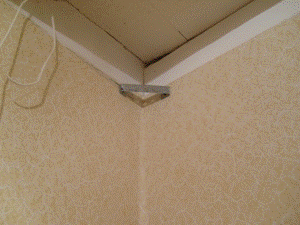
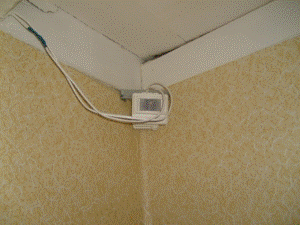
At the end of all installation work, you need to check the operation of the sensor. Enter its visibility zone - if the light turns on immediately after entering the room, then everything is set up correctly. Then set the desired interval for turning off the light. If the sensor does not work a bit, use the toggle switches to configure. located on the sensor housing. It will also be useful to try the sensor in its various positions - thanks to the bracket, the sensor can be twisted and rotated.
See also on this topic: Motion Sensor Connection Diagrams andHow to choose, configure and connect a photo relay for outdoor or indoor lighting
See also at e.imadeself.com
:
