Categories: How does it work
Number of views: 30,229
Comments on the article: 12
How do remote-controlled chandeliers work?
Ways to control fixtures without the use of stationary switches are increasingly gaining popularity among the population. This is due to the ease of use and widespread availability of kits for sale, which make it quite easy to switch existing chandeliers to remote shutdown or inclusion.
Manufacturers have now massively mastered the production of original luminaires with LED lamps and garlands that create beautiful lighting effects while saving energy.
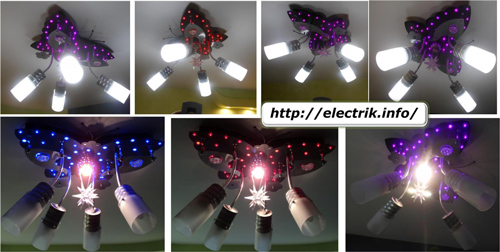
They can be used without rising from a chair or sofa using a small remote control.
The principle of remote control lighting
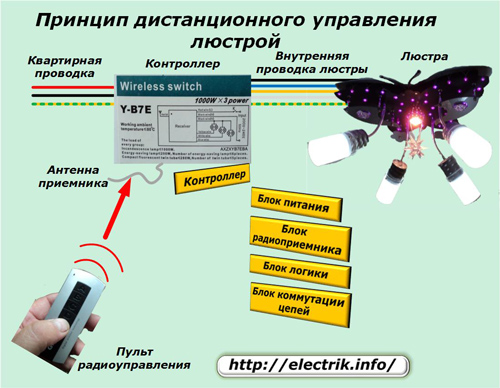
The basis for remote control is the transition from traditional circuit breakerslocated on the walls of rooms and connected by wires with a chandelier and an apartment shield, for the use of radio control channels. To do this, apply:
-
a radio transmitter mounted in a compact and convenient remote control;
-
a radio receiver receiving commands from the user and transmitting them to the executive unit;
-
electrical power systems for the remote control and receiver.
Structurally, the radio receiver is located on the same electronic board with power supplies, logic and executive bodies on relay keys and is called in one word - “controller”. It is powered from the apartment wiring, placed near the chandelier and connected to it by connecting wires.
The radio signal from the remote control, received by the antenna and amplified by the radio receiver, is processed by the logic and fed to the switching unit that connects certain luminaires.
Remote Control Technical Features
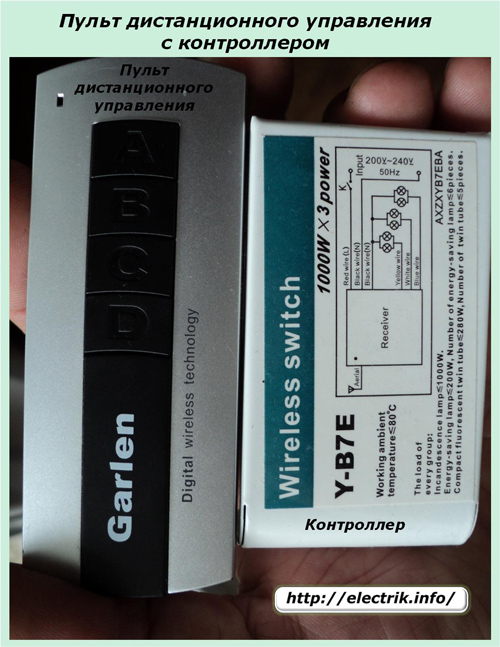
All of the above elements can have a different set of functions and, accordingly, differ in design complexity and cost. Consider their characteristics on the example of a common budget option kit shown in the photo.
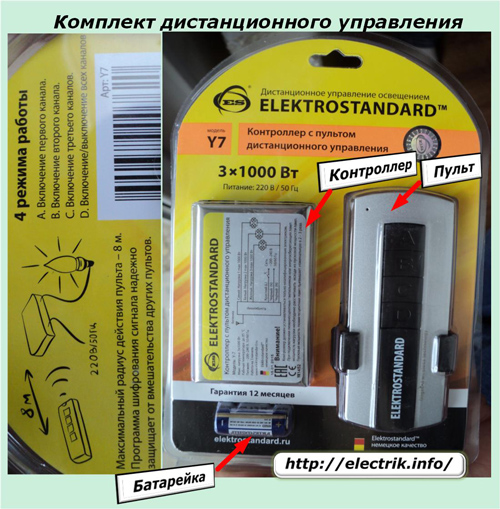
The console and controller are designed to work together with each other. They are tuned to one common frequency and, in addition, use a specially designed radio encryption algorithm for them. This is done in order to exclude the control of the chandelier from the owners of other apartments using similar equipment.
But, it is worthwhile to understand that if one of these elements breaks down and you need to replace it with another, you will have to buy a new remote control together with the controller.
The kit in question works with three autonomous lighting channels, each of which can have a load of up to 1 kilowatt, which is more than enough for home use even when using powerful incandescent lamps. However, when operating fluorescent or energy-saving lamps, it should be borne in mind that their starting currents are up to four times higher than the rated values.
To control the lighting channels, 3 buttons are installed on the remote control: A, B, C, and the fourth D is designed to turn on the lights or completely relieve voltage from them.
Removing this remote control from the controller at an eight-meter distance is quite enough for our apartments, although there are models of radio transmitters on sale that can control at distances of a hundred meters.
The remote control is powered by a galvanic battery, which is included in the kit, and the controller - from the network through the unit built into the board.
The kit in question has one feature: the phase voltage and the working zero of the apartment wiring must be connected to the controller input. If you turn it off, and then apply it from the switch with the power off, the chandelier starts to glow, bypassing the radio channel.
This allows you to control the light of the chandelier without remote control of conventional wall switches, but at the same time creates the inconvenience associated with its possible unauthorized lighting in the night or daytime.
A similar case can occur when the lamps are turned off by the radio remote control, and due to the occurrence of even short-term malfunctions in the power supply organization, consumers were disconnected and then turned on. The controller perceives the supply of such voltage as a command to start lighting.
Lighting Designs for Remote Controls
Remote control kits allow you to control the operation of any lighting fixtures. To do this, just pick them in accordance with the technical characteristics:
-
operating and starting current;
-
mains voltage;
-
frequency.
Any old chandelier with incandescent lamps can be equipped with remote control: it is enough to mount the controller in the electric circuit and use the remote control.
Usually for this they try to build in the controller board:
-
inside the protective steel cover of the chandelier that covers the lamp wires;
-
into the ceiling hole near the mounting hook;
-
in place of the switch.
The latter case is rarely used: it requires the laying of additional wires from the switch to the illuminators.
Modern LED chandeliers can use combinations of different light sources:
-
lamps;
-
garlands;
-
additional illuminators creating special effects.
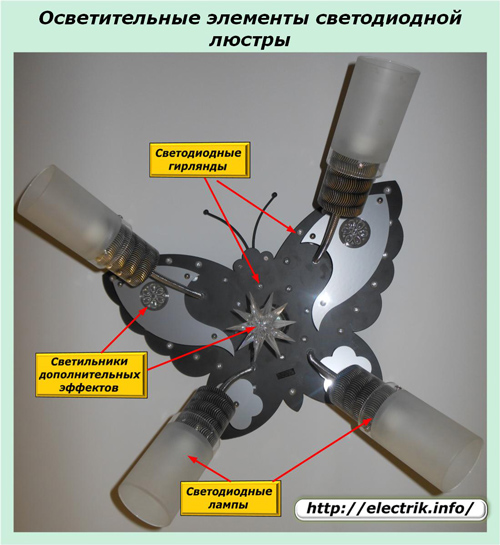
However, for some sources, you may need your own power and control circuits. An example is LED garlandwhich, when turned on, begin to work according to previously prepared algorithms.
Remote Control LED Chandelier Design
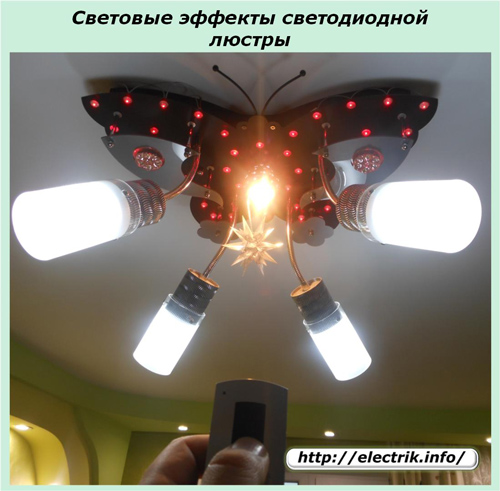
We will consider this question using the example of the model shown in the above photo. It comes with a controller and remote control, allowing you to use the same four modes: A, B, C, D.
Due to its design, the chandelier allows you to create various lighting compositions. It looks like one of them.
For mounting on the ceiling, a typical fixing plate is used, which is attached to the supporting concrete slab using dowels and self-tapping screws. At the base of the chandelier, two holes are made through which the studs are threaded. Decorative nuts are screwed onto their threads to support the weight of the structure through the washers.
The base of the removed chandelier is usually hollow to accommodate all electrical parts in its space and to ensure their installation.
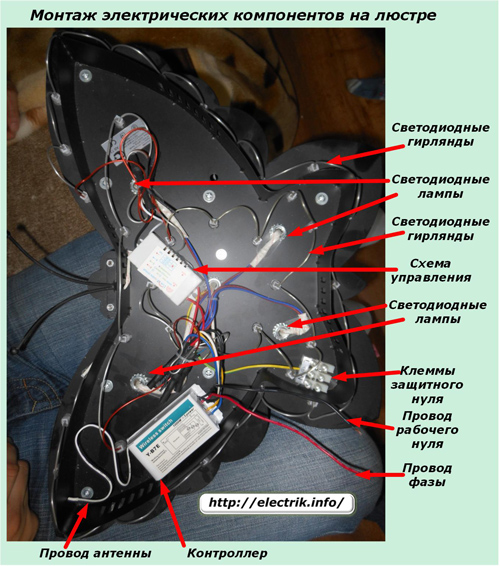
In the photo are highlighted:
-
power wires and protective PE conductor;
-
controller with antenna;
-
LED lamps and garlands;
-
scheme for creating special effects of additional fixtures.
The controller mount is shown in more detail in the next photo. For clarity, the cover is removed from it.
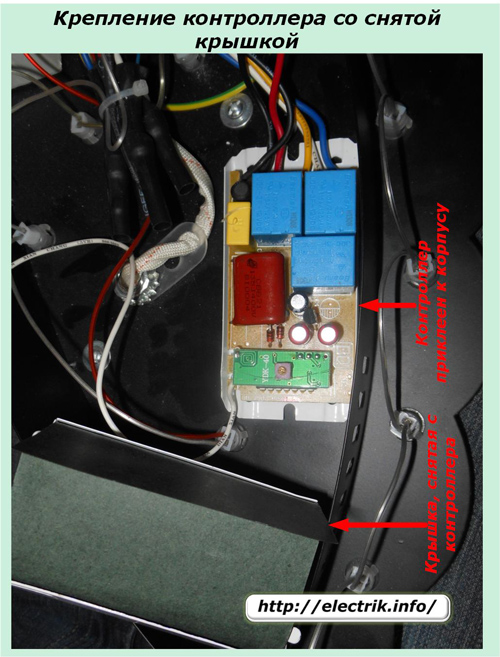
The bottom box of the controller housing on this chandelier is firmly glued to its base. However, the board itself is not difficult to remove from there.
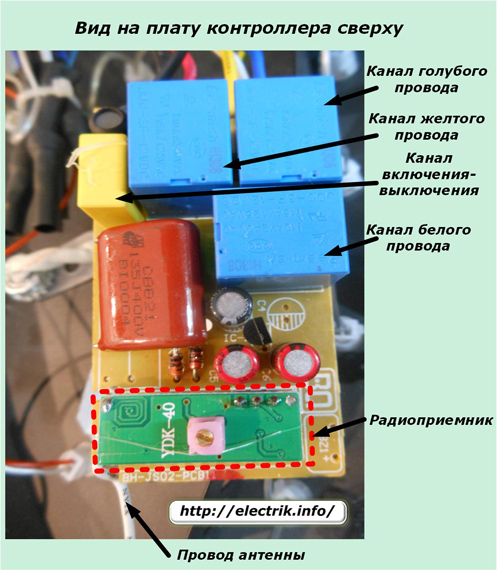
On the board are clearly visible:
-
three channels of switching channels A, B, C, which have outputs indicated by wires of blue, yellow and white;
-
device enable and disable channel;
-
radio microcircuit with antenna wire.
The same elements can be viewed from the back of the board.
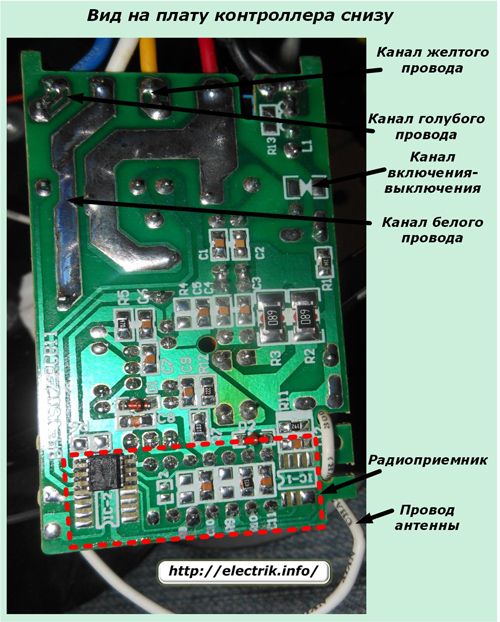
Switching channels allow you to use all the lights at the same time to create maximum lighting or to set the half mode of their application along the internal or external circuit.
On the top of the photo it is clearly visible that the red wire of the network phase is soldered to the track contact and wired along it according to the controller circuit. The working zero is specially made by two wires for a separate one:
-
use in the controller circuit;
-
power lamps, garlands of fixtures.
Hidden remote control features
Even a simplified version of the considered chandelier allows you to additionally use certain functions of the devices. You can free at least one lighting channel and use it for other purposes, for example:
-
to manipulate a separate group of spotlights;
-
open or close window curtains by means of an electric drive;
-
control the operation of the projector or other electrical devices.
More complex models of controllers and consoles can significantly expand the list of operations performed by them according to certain algorithms, by:
-
selection of colors;
-
inclusion of certain groups of lamps;
-
brightness adjustment;
-
Using a timer to control lighting on a schedule.
The remote controls described in this article are now undergoing changes. More advanced voice-activated models begin to be introduced to the circuit.
Disadvantages of Remote Control Chandeliers
Manufacturers of consoles and controllers indicate the maximum operating temperature in their technical specifications for their products. In the devices shown in the photographs, it is 85 degrees. This is a very important characteristic that many owners simply do not pay attention to.
Any electrical components work well when appropriate conditions are created for them. Microcircuits and semiconductor elements do not tolerate overheating and burn out. Many varieties of fusible solders flow with increased heat.
Where is the controller located? The answer is simple: at the highest point of the ceiling, which is always the most heated. In addition to everything, the board is placed in an unventilated metal box hidden in the chandelier body. Then it remains to compare the load power of the luminaires, especially with incandescent or halogen lamps, the release of heat spent on heating the general design and make a conclusion about a possible reduction in the operating life declared by the manufacturer.
For this reason, you should always evaluate the possibility of heat removal from the electronic components of the controller or at least ways to control its temperature, which many owners do not do at all. In this situation, the location of the electronics next to the chandelier, but with the exception of the heat transfer of lamp energy to it, will be the most acceptable solution.
See also: How to connect a chandelier to a switch
See also at e.imadeself.com
:
